York YVAA
EVAPCO Alcoil manufacturers replacement condenser coils
for York brand chillers, specifically for the York YVAA. These
replacement coils are designed as a near perfect drop-in,
with higher quality and designed for longer life. The coils are
83.0" wide by 47.2" tall by 1.9" deep and have copper I.D.
solder connections.
Key Features
• Available from Stock. Contact factory for availability.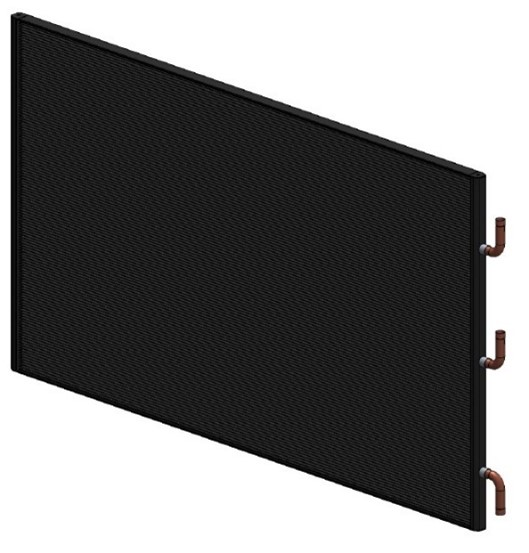
• UL Listed, U.S. & Canada
• Five (5) Year Limited Warranty Against Defects in Materials
& Workmanship
• 650 PSI Working Pressure for R410A or R134a Service
• Epoxy Coated for Additional Corrosion Protection
• For MicroChannel and/or Fin/Tube Coil Replacement
• Replacement for PN: 026-45677-000, 026-46798-000,
326-45677-000, 326-46798-000
Model:
C46.4x80.8x1.25H-24E07-V4297C
(E-Coated)
Comparative Advantages
• Made in the USA
• Proven Performance and Robust Design
• 100% Factory Leak Tested
• Constructed with Long Life Alloy for Extended Service Life
• Designed to Replace Fin/Tube and MicroChannel Coils in
York Chillers
Best Replacement Coils
EVAPCO Alcoil replacement coils are designed as an UPGRADE to the original manufacturers
heat exchanger, either MicroChannel type or Fin/Tube type. The heat exchanger is UPGRADED
with Long Life Alloy and E-Coating to assure long life corrosion protection. As a primary supplier
to major HVAC & Refrigeration Original Equipment Manufacturers, EVAPCO Alcoil leads the
industry in MicroChannel heat exchanger Design, Quality, and Customer Service. All EVAPCO
Alcoil heat exchangers are made in York, Pennsylvania, USA and are shipped from stock or made
to order.
Product Drawing:

E-Coating (Standard for All York YVAA Replacement Coils)
Recommended for corrosive applications such as industrial applications and sea coast environments.
Recommended for replacement coils where the previously failed coil shows signs of refrigerant oil spots or leaks
on the coil, due to corrosion.
• Epoxy Electrocoat, 0.001 Inch Nominal Coating Thickness
• Black, Semi-gloss appearance
• UV Topcoat
Installation Guidelines
• Remove existing coil(s) using standard industry practices and in accordance with refrigerant recovery regulations.
• Install new coils. Condenser inlet connection must be at the top, per the drawing. Do not install upside down. Use
care to not damage coil face while handling.
• Mounting hardware kit is included with the shipment. The existing factory brackets on the chiller can be used with
longer bolts and spacers supplied in the kit.
• Two existing 1-1/8” Inlet connections to connect to the two 1-1/8" Inlet connections.
• 1-1/8" Outlet connection to connect to 1-1/8" Outlet connection.
• Solder copper connections using Silver solder or Phos-Copper method. Use wet rag on Al side of connections to
protect the Al/Cu joint from overheating and damage to the Al/Cu joint.
• Replace one or all coils in each compressor circuit.
• Leak check all connections. Re-charge the system using the original OEM’s recommended refrigerant charge
quantity, then adjust using site glass (minimal bubbles) and sub-cooling at 5F to 10F.